

The units are only one part of the timeline: a typical kitchen fitting takes 1 to 2 weeks. Understanding what to expect during kitchen installation means allowing for the work around them too, from removing the old kitchen and preparing the walls to fitting cabinets, worktops, flooring and tiles. Larger projects or structural changes can take longer.
It’s natural to want a clear idea of how long your kitchen will be out of action and when each stage happens. This guide explains what to expect during kitchen installation, what can affect the schedule and how to prepare your home before fitting begins. Details such as plaster drying time, flooring choices and made-to-measure worktops can influence the finish date. With a realistic timeline, you can plan for disruption, make practical arrangements and look forward to a kitchen that feels considered from the first unit to the final finishing touch.
Key Takeaways
- Allow around 1 to 2 weeks for a typical kitchen fitting, then adjust your plans for the scale of the work and any custom elements.
- Prepare for the strip-out by emptying cupboards and worktops, setting up a simple temporary kitchen and keeping the work area clear.
- Understand how removal, first-fix work and wall preparation affect when the units and worktops can be installed.
- Plan flooring, tiling and finishing in the right sequence so drying times and final details are accounted for.
How Long Does a Kitchen Fitting Actually Take?
A typical kitchen fitting takes 1 to 2 weeks, depending on the room and work involved. Use these steps to prepare for the schedule and the disruption.
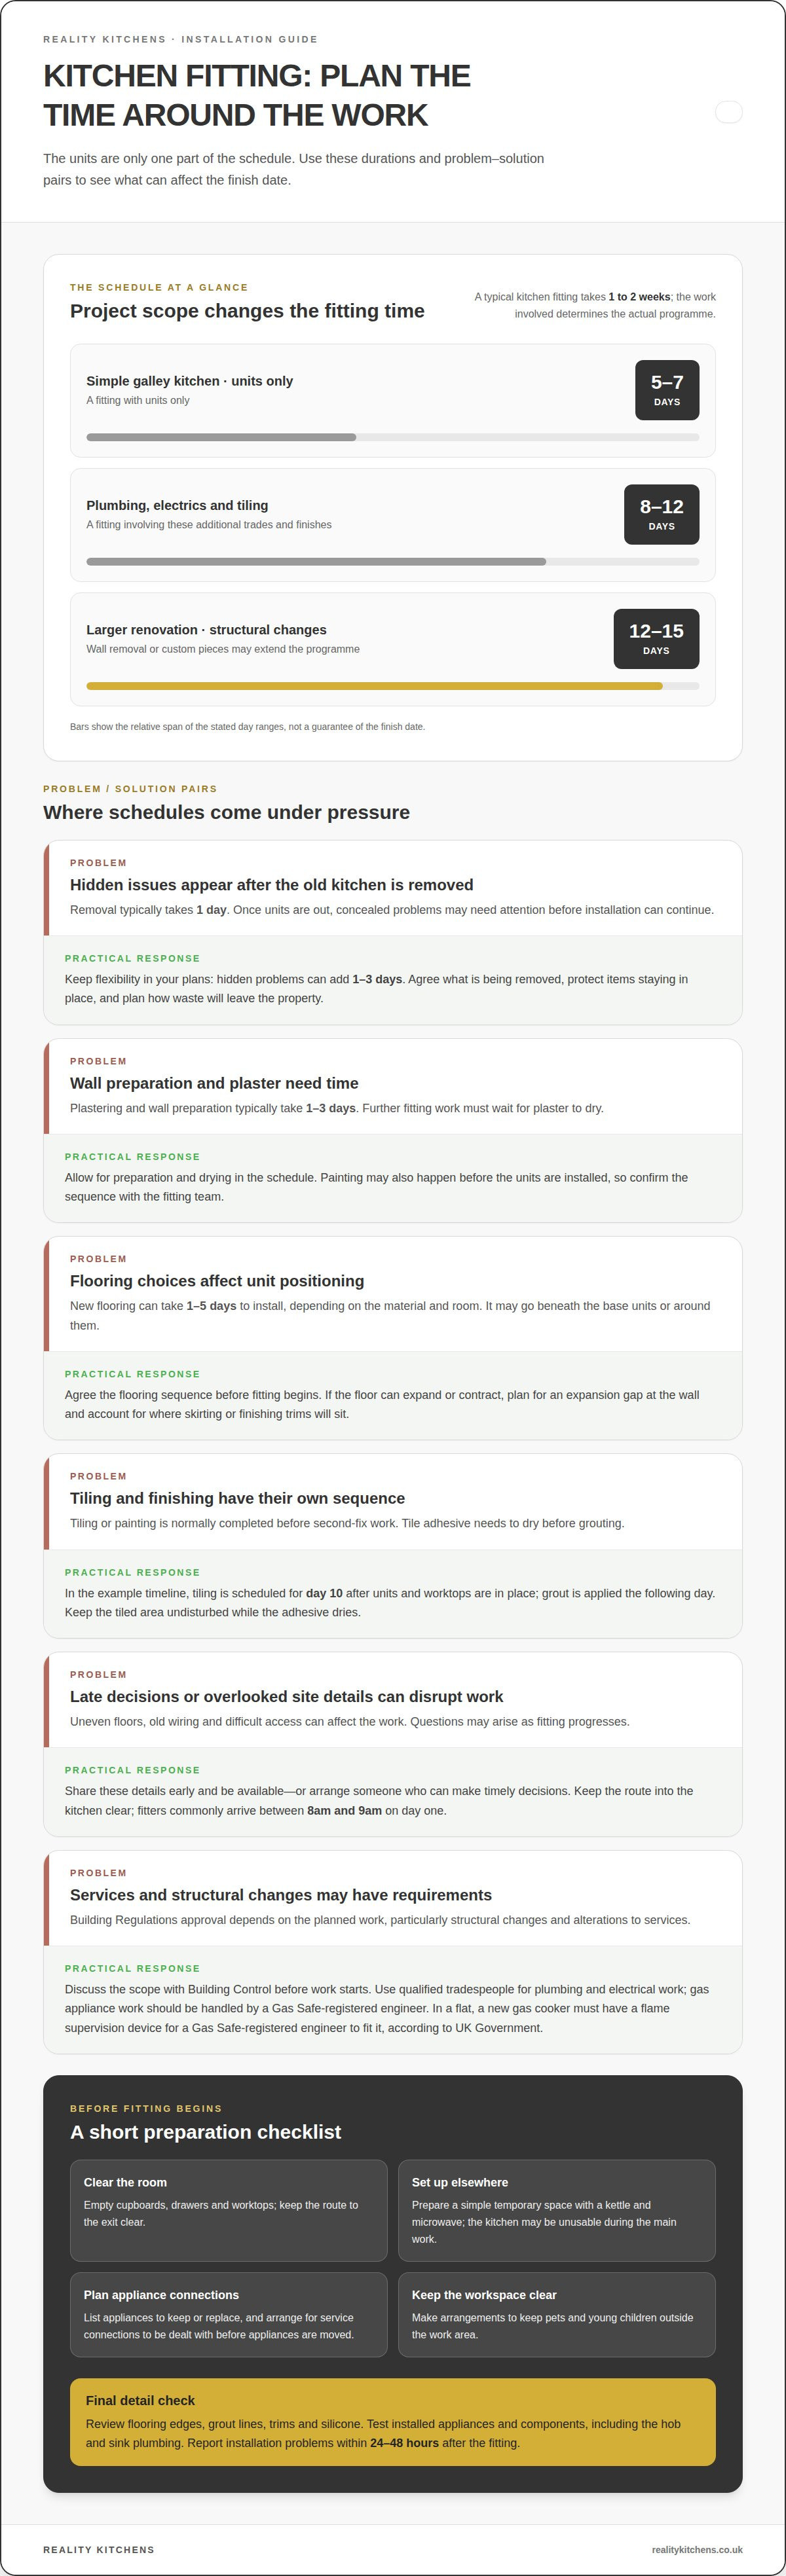
- Plan around the work. A simple galley kitchen with units only can take 5-7 days. A fitting involving plumbing, electrics and tiling may take 8-12 days. Larger renovations with structural changes can take 12-15 days. Wall removal or custom pieces may extend the programme.
- Clear the kitchen before fitting starts. Empty every cupboard and drawer, then remove everything from the worktops. Make a temporary space elsewhere with a kettle and microwave, as the kitchen may be unusable during the main work.
- Prepare for the first morning. Fitters commonly arrive between 8am and 9am on day one. Keep the route into the kitchen clear, and make arrangements to keep pets and young children outside the workspace.
- Share important details early. Tell the fitting team about uneven floors, old wiring or difficult access before work begins. Be available, or arrange someone who can make timely decisions when questions arise.
- Allow time for wall preparation. Plastering and wall preparation typically take 1-3 days. Let plaster dry before further fitting work proceeds; painting may also happen before the units are installed.
- Check approval and trade requirements. Building Regulations approval depends on the work planned, particularly structural changes and alterations to services. Discuss the scope with Building Control before work starts. Use qualified tradespeople for plumbing and electrical work; gas appliance work should be handled by a Gas Safe-registered engineer. In a flat, a new gas cooker must have a flame supervision device for a Gas Safe-registered engineer to fit it, according to UK Government.
- Set a realistic budget. Kitchen installation costs depend on the room, chosen materials and work involved. The price depends on the project and is provided after a quote request.
Removing the old kitchen
Kitchen removal is usually the first fitting stage and typically takes 1 day. A careful strip-out clears the room for the renovation while helping reveal what needs attention before new units go in.
- Agree the removal plan. Before work starts, confirm which cupboards, appliances, worktops and flooring are being removed. Identify anything staying in place, such as a freestanding appliance or a section of flooring, so it can be protected during the strip-out.
- Empty and clear the room. Remove food, crockery and kitchen equipment before demolition begins. Keep the route from the kitchen to the exit clear, giving the fitting team space to carry out old units and materials safely.
- Prepare for appliance removal. Make a clear list of appliances being replaced or retained. Arrange for service connections to be dealt with before appliances are moved, rather than attempting to shift connected equipment during the strip-out.
- Expect removal to happen in stages. Worktops and wall units are removed before base units, with care taken around adjoining walls and surfaces. This staged approach helps expose the area behind cabinets without forcing parts away from the wall.
- Allow for hidden problems. Once units are out, the fitter may find issues that were concealed by cabinets. Hidden problems can add 1-3 days to a UK kitchen fitting, so keep some flexibility in your plans if repairs are needed before installation continues.
- Set out waste arrangements. Agree how old units, packaging and other removed materials will leave the property. A clear plan for carrying waste out helps keep access routes open and makes the transition from strip-out to preparation smoother.
- Use the cleared room to review the layout. With the old kitchen removed, the wall and floor condition becomes easier to assess before the next stage. If you’re considering a different arrangement, review your kitchen layout before new units are fitted.
Tiling, flooring and finishing details
- Confirm the flooring sequence. New kitchen flooring can take 1 to 5 days to install, depending on the material and room. Some fitters lay it beneath the base units; others fit flooring around them. Agree the sequence before fitting begins, because it affects unit positioning and the installation timeline.
- Allow for movement in the floor. Flooring that expands or contracts may need an expansion gap at the wall. This detail gives the material room to move and affects where skirting or finishing trims sit. Include it in the plan rather than treating the edge as an afterthought.
- Schedule tiles around second fix. Tiling or painting kitchen walls is normally completed before second-fix work. This lets plug sockets sit on top of the finished surface. In the example timeline, tiling is scheduled for day 10, after units and worktops are in place.
- Give tile adhesive time to dry. Grout is applied the day after the tiles are fitted, once the adhesive is dry. Keep the tiled area undisturbed during this interval. Rushing this stage can affect the neat finish around sockets, corners and worktop edges.
- Finish worktop joins carefully. Seal kitchen worktops around the hob and sink with mould-resistant silicone. These edges meet areas exposed to water and cooking, so a continuous seal is an important finishing detail. Check that the seal follows the joins cleanly.
- Review the completed details. Check flooring edges, grout lines, trims and silicone once the main fitting is complete. Test installed appliances and components, including the hob and sink plumbing. If an issue appears, report kitchen installation problems within 24-48 hours after the fitting.
A kitchen design determines how flooring, tiles, sockets and worktop edges meet. Planning those details as part of one sequence helps the finished room feel cohesive, rather than like separate jobs completed at different times.
Installing kitchen units
- Confirm the layout before fitting starts. Knowing what to expect during kitchen installation begins with checking that the chosen plan places units around the intended appliances, sink and cooking area. A clear layout helps the fitting team follow agreed positions and spot decisions that could affect worktop joins or access.
- Fit base units before planning the worktop. In an example kitchen timeline, base and wall units are fitted on days 5-6. The base units provide the reference for worktop measurements, so accurate positioning matters before templating begins.
- Check alignment as the units go in. Compare each cabinet’s position with the agreed layout, including corners and runs beside walls. Small adjustments during fitting can help keep doors, drawers and adjoining units aligned, rather than leaving corrections until the worktops are in place.
- Keep appliance spaces in view. Confirm that the openings shown in the plan remain clear as units are fitted. For example, the space beside a sink cabinet may affect pipe access, whilst a hob position influences the worktop cut-out.
- Allow the worktop stage to follow the cabinets. Worktop templating can take place after the base units are fitted. Stone or quartz worktops may need an additional 5-10 days for templating and fabrication, which can extend the fitting timeline.
- Use the installation sequence to make decisions promptly. A consultation or fitting discussion is the time to resolve practical choices, such as cabinet placement or how a corner run meets a wall. Understanding what to expect during kitchen installation also means being ready to settle these details as the work progresses.
- Review the finished unit run before final connections. Check that doors and drawers open freely and that units sit in the intended positions. Worktop installation and second-fix work are scheduled for days 8-9 in the example timeline. To shape a layout around your room, plan your kitchen design.
Reality Kitchens
Reality Kitchens helps you shape a kitchen plan around your home, chosen layout and installation timeline. Its bespoke kitchen design service brings key decisions together before work begins, including the kitchen components, appliances and worktops selected for your space.
Planning these elements as part of one considered design clarifies how the finished room should look and which details need coordinating during installation. It also gives you a practical starting point for discussing the project and its stages, rather than treating each choice in isolation.
If you’re ready to plan your new kitchen, contact Reality Kitchens to discuss your project.
Start shaping a kitchen around your home
Knowing what to expect during kitchen installation helps you make confident choices before work begins. Start by turning practical details into a plan that reflects how you cook, store essentials and move through the room. Consider what works well in your current kitchen, where space feels awkward and what you want to change. These priorities can guide decisions while keeping the finished kitchen functional.
Reality Kitchens brings those decisions together through bespoke kitchen design, components and appliances. A considered plan gives you a clearer basis for discussing the look and practical requirements of your new space, while keeping the choices connected.
Ready to explore what could work in your home? Contact Reality Kitchens to discuss your project. A thoughtful start can help turn your ideas into a kitchen that feels distinctly yours.
Frequently Asked Questions
Do customers need to empty their kitchen before work begins?
Yes. Empty cupboards and drawers, and clear worktops so the fitting team can reach units and surfaces. Pack food, crockery and utensils into labelled boxes, keeping daily essentials accessible elsewhere. Remove personal items from the work area too. This makes it easier to distinguish household belongings from items being removed during the strip-out.
How long does it take to fit a standard kitchen?
A basic kitchen fitting can take 2-5 days, whilst a typical installation usually takes 1 to 2 weeks. The difference depends on what the project includes: fitting units alone is simpler than coordinating plumbing, electrical work, tiling or custom pieces. Treat the fitting schedule as distinct from the wider design and preparation period, which starts before installation day.
What can cause delays?
Hidden damage uncovered during removal, incorrect or damaged deliveries, and made-to-measure worktops can all affect the schedule. Replacements may add 2-5 days, while stone worktop templating, fabrication and installation can add 7-14 days. Plaster also needs to dry before later work proceeds. These dependencies mean a delay in one stage can move the date of following tasks.
What happens after the fitting?
Once the main work is complete, test the appliances and components to check they operate as intended. Look over doors, drawers, worktop edges and tile grout in good light, and note any areas needing attention. Report installation issues within 24-48 hours after the fitting. Keep the project paperwork and appliance instructions together for future reference and routine care.
What can I do to make the installation go as smoothly as possible?
Keep the access route clear, arrange a temporary place to prepare simple meals, and make sure the fitting team can reach the kitchen. Before work starts, share details such as uneven floors, old wiring or access difficulties. Stay available for decisions at key stages, or arrange someone who can respond. Keep children and pets away from the active work area.
What does the typical installation process look like?
The work generally moves from removal to first-fix plumbing and electrical work, followed by wall preparation and plastering. Units are fitted before worktops; second-fix connections, splashback tiling and finishing follow. The exact order can vary depending on the materials and room. For example, a stone worktop needs to be templated after the base units are installed, then fabricated and fitted.


