

Don’t overlook the underside of a solid wood worktop. Good solid wood worktop maintenance starts with a slightly damp cloth, prompt spill clean-ups and products made for wood. Treat untreated surfaces with a suitable oil or wax, and pay particular attention to the underside, where moisture can be a concern.
It’s easy to focus on the surface you see every day, but moisture can affect the wood beneath it too. Re-oil when the finish loses its appearance or liquids stop forming droplets. Your solid wood worktop maintenance routine should also reflect how heavily each area is used.
This guide explains how to clean your worktop, recognise when it needs re-oiling, seal untreated wood and protect the underside. Follow these practical steps to help preserve the finish and the natural character of your worktop in a hardworking kitchen.
Key Takeaways
- Treat a new wooden worktop with oil before you use it, and make sure the surface is completely dry before application.
- Use a cleaner made for wood rather than standard kitchen products, which can stain or discolour the finish.
- Set your re-oiling routine around how heavily each area is used; busy sections need attention more often than quieter ones.
- For untreated wood, prepare and seal the surface carefully, and consider moisture exposure when deciding how to protect the underside.
Wooden Worktop Cleaner: How To Clean and Maintain Worktops?
Use these steps to clean wooden surfaces, protect their finish and prepare a new worktop before use.
-
Clean pre-oiled worktops daily
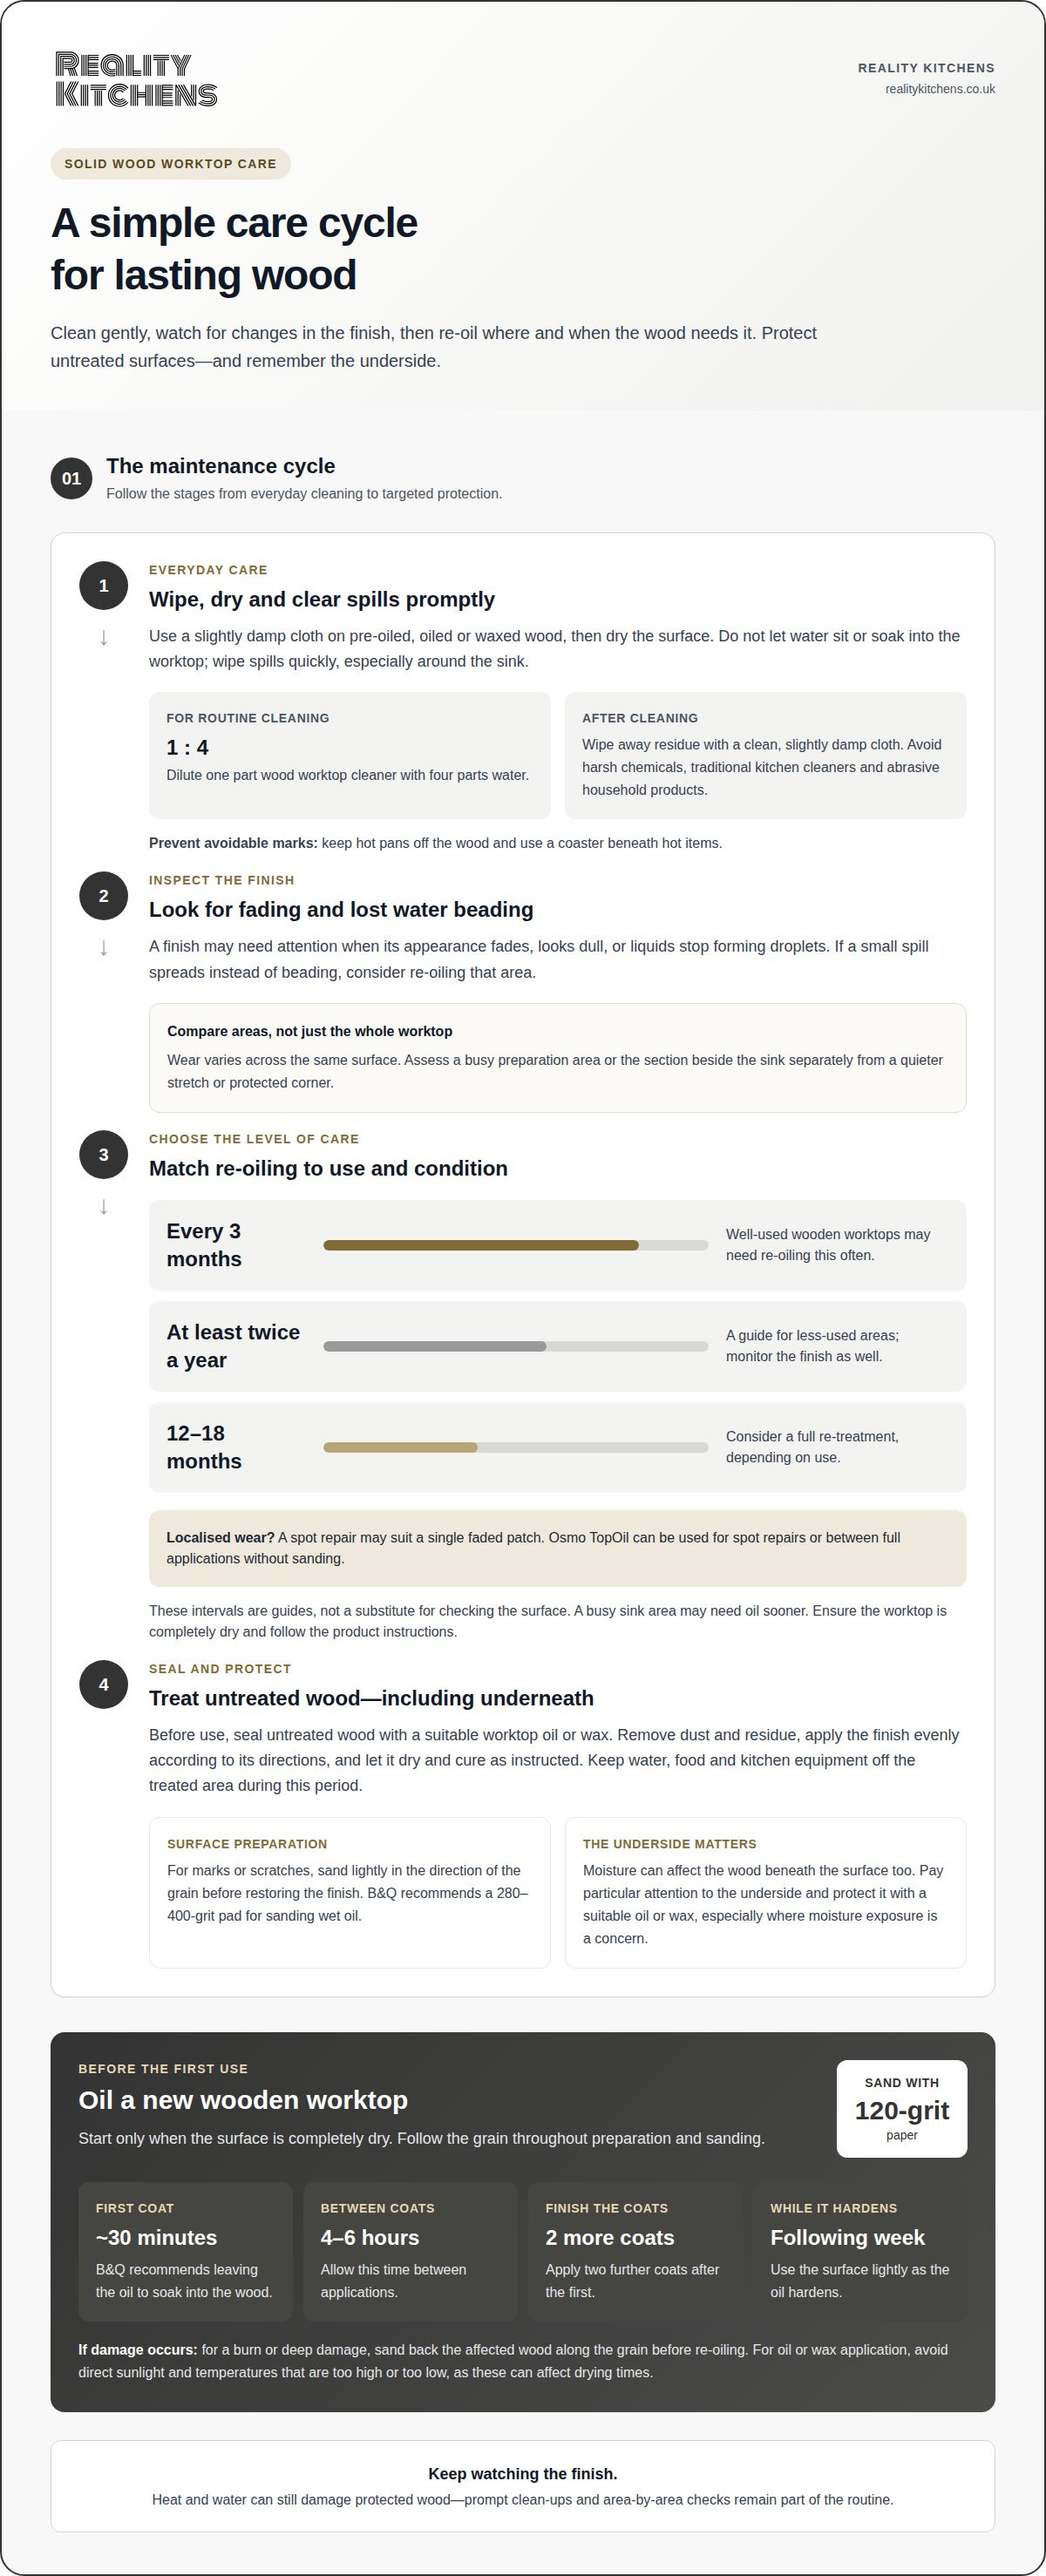
Wipe a pre-oiled worktop with a slightly damp cloth, then dry it rather than letting water sit. Clear spills promptly to help prevent watermarks, especially around the sink. For marks or scratches, sand lightly in the direction of the grain before restoring the finish. Keep hot pans off the surface and use a coaster beneath hot items.
-
Dilute an everyday cleaning solution
Choose a wood cleaner made for worktops and dilute it at one part cleaner to four parts water for everyday cleaning. Wood worktop cleaner is available as a dedicated kitchen-care product. Avoid harsh chemicals and traditional kitchen cleaners, which may stain, discolour or bleach real wood. Wipe with the diluted solution, then use a clean, slightly damp cloth to remove any residue.
-
Clean oiled and waxed surfaces
Use a slightly damp cloth on oiled or waxed wood, and avoid soaking the surface or using abrasive household products. For untreated solid wood, choose a suitable worktop oil or wax and follow the product directions. Spilled food and liquids can mark wood if left in place, so wipe them promptly. The cost of maintenance or refinishing depends on the work, area and damage, and is provided after a quote request.
-
Oil new wooden worktops
Before using a new worktop, make sure it’s completely dry and lightly sand it with 120-grit paper, following the grain. B&Q recommends leaving the first coat of oil on a wooden worktop for around 30 minutes to soak into the wood. Allow 4-6 hours between coats, applying two more coats after the first. Use the surface lightly while the oil hardens over the following week. For a burn or deep damage, sand back the affected wood along the grain before re-oiling.
Recognising when a worktop needs re-oiling
Check for changes in the finish and how water behaves on the surface. Use these signs, along with how heavily the worktop is used, to plan re-oiling.
- Check whether the finish still looks even and protective. A worktop may need oil when its appearance fades or liquids stop forming droplets on the surface. Compare a busy preparation area with a less-used section, as wear can vary across the same worktop. If the finish looks dull and a small spill spreads rather than forming droplets, plan to re-oil that area.
- Set a routine based on use rather than relying on one date for every surface. Well-used wooden worktops may need re-oiling every three months. Less-used areas need attention at least twice a year. For example, assess the section beside the sink separately from a stretch used mainly for occasional preparation.
- Address localised wear before it spreads. A frequently wiped area can lose its sheen sooner than a protected corner, while repeated splashes can leave the finish looking tired. If only one patch shows fading or poor water beading, consider a spot repair. Osmo TopOil can be used for spot repairs or between full applications without sanding.
- Consider a full re-treatment every 12-18 months, depending on use. This is a broader maintenance interval, not a substitute for watching the finish: a busy sink area may need oil sooner. Before applying oil, ensure the surface is completely dry and follow the product instructions. If you’re planning a new kitchen surface as well as ongoing care, explore wooden kitchen worktops.
Even a protected surface is not immune to damage. New wooden worktops, tables, kitchen counters and other solid wood furniture can be vulnerable to heat and water, even when protected. Keep this in mind when assessing the finish, and don’t assume protection removes the need to monitor it.
For less-used worktop areas, re-oil at least twice a year. A finish that loses its appearance, or a surface where liquids no longer form droplets, is another reason to consider re-oiling. Check these signs alongside the level of use to keep the wood in good condition.
Sealing untreated wooden worktops
Seal untreated wood before using it in the kitchen with a suitable worktop oil or wax. Prepare the surface carefully and apply the protective finish according to the product directions.
- Choose a finish intended for wooden worktops. Untreated surfaces need a suitable wood oil or wax to seal them. Osmo describes TopOil as food safe under EN 1186, making it one named option for a kitchen surface. Match the finish to the worktop and follow its application instructions, rather than applying a general-purpose household product.
- Prepare the bare wood before opening the finish. Remove dust and residue so they don’t become trapped beneath the oil or wax. If sanding is needed, use a sanding pad suited to the product’s instructions. B&Q recommends a 280-400-grit pad for sanding wet oil on a wooden worktop. Keep the surface clean as you work.
- Apply the finish in suitable conditions. Avoid direct sunlight and temperatures that are too high or too low, as either can affect drying times. Work across a manageable area and spread the oil or wax evenly, following the product directions. Take care around joins and edges, where a missed patch can leave wood exposed beside sealed areas.
- Let the finish dry as directed before using the worktop. Don’t assume it is ready just because it feels dry to the touch; follow the chosen product’s drying and curing instructions. Keep water, food and kitchen equipment off the treated area during this period. If you spot an uneven patch, follow the product’s repair instructions rather than adding an unplanned coat.
For untreated wooden worktops, use an appropriate wood oil or wax. When applying oil, avoid direct sunlight and temperatures that are too high or too low, as these conditions can affect drying times.
Treating the underside of a worktop
Yes, treat the underside, especially where moisture exposure is more likely. Sealing both faces helps protect the wood from moisture, which can contribute to uneven changes in the timber and increase the risk of warping, cracking or splitting.
- Identify areas beneath the worktop that may encounter moisture. Check around the sink, pipework and appliances, where leaks or condensation could dampen the underside. Treating these vulnerable areas is important, but consider the whole underside as part of the worktop’s protection, not just the visible surface.
- Prepare the underside before applying a finish. Remove dust and loose residue so they don’t become trapped beneath the treatment. Make sure the wood is dry, then use an appropriate worktop oil or wax. Follow the chosen product’s instructions for preparation, application and drying.
- Apply the finish evenly across exposed timber. Work carefully around cut-outs and edges, as these areas can leave wood exposed to moisture. Don’t leave untreated strips beside sealed sections. If the underside will be hard to reach after installation, treat it beforehand while the surface is accessible.
- Keep moisture exposure in mind after fitting. Wipe up dampness beneath the sink or around pipework, and address leaks promptly rather than allowing water to sit against the timber. Check the underside periodically for damp patches or changes in the finish. If a patch looks worn, prepare and re-treat it according to the oil or wax instructions.
For a worktop project where the visible finish and hidden surfaces both matter, explore kitchen worktops as part of your kitchen design.
Reality Kitchens: Kitchen Worktops
Reality Kitchens can help you choose kitchen worktops as part of a considered kitchen design. If you’re planning a new solid wood surface, its Bespoke Kitchen Design service can bring worktop choices together with kitchen components and appliances, helping you think through the space as a whole.
Discuss how you use your kitchen, including busy preparation areas and moisture-prone spots around the sink. These details can guide worktop selection and the practical care it will need. For a new kitchen or a worktop update, contact Reality Kitchens to talk through your plans.
Plan a kitchen that feels right for everyday life
A solid wood surface is part of a wider kitchen, shaped by how you cook, clean and use the space. Let your experience caring for the worktop inform your design decisions: consider where you prepare food, how you use the sink area and which materials suit your routines. This practical knowledge can make solid wood worktop maintenance easier to build into daily life.
If you’re planning a new kitchen or updating an existing one, Reality Kitchens can bring your worktop choices into a considered design. Book a home visit to discuss your space and how you want it to work for you.
Contact Reality Kitchens today to discuss your kitchen plans and take the next step towards a space that feels welcoming, practical and distinctly yours.
Frequently Asked Questions
Do I need to treat the undersides of a worktop?
Yes, especially beneath a sink or near pipework, where moisture exposure is more likely. Treating the underside helps protect areas hidden from everyday view, including exposed edges and cut-outs. If the worktop is already fitted, focus on accessible timber and keep the area dry. Before installation, treating the underside is easier because you can reach the full surface.
How do you clean a solid wood worktop day to day?
Use a slightly damp cloth, then dry the surface rather than leaving moisture behind. For example, after preparing food beside the sink, wipe away crumbs and splashes promptly. Choose a cleaner formulated for wood, not a general kitchen spray, which can affect the finish. Don’t leave hot pans or wet items directly on the timber.
How often should you oil a solid wood worktop?
Base the schedule on wear: well-used areas may need oiling every three months, while less-used areas need attention at least twice a year. A full re-treatment can be considered every 12-18 months, depending on use. These intervals are useful guides, but the finish gives the clearest cue: re-oil when it looks tired or water stops beading.
How do you oil a solid wood worktop step by step?
Start with a completely dry surface and sand lightly along the grain using 120-grit paper. Apply an even coat of suitable worktop oil, leave the first coat for around 30 minutes, then buff away excess. Allow 4-6 hours between coats, following the product instructions. Apply two more coats after the first, then use the surface lightly during the following week.


